Pocket doors are a charming feature used in many homes. These doors allow you to hide them in the wall to create a wide opening without any obstruction. The problem with these sliding doors is they may need repairs from time to time. This may leave many homeowners wondering how they go about fixing something they can’t see because it is hidden in the wall. I will help you understand the process of fixing a pocket door without fail. Follow these tips when your home’s hidden door needs fixing.
Contents
Issues and Problems with Sliding Doors
There are a variety of problems that can occur with a pocket door. Some require a simple fix, while others may need a more extensive door repair. I’ve broken down the most common problems here in this handy guide so you can diagnose the issues with your sliding door and know how to fix them.
Roller Issues
One of the most common problems that occur is with the rollers. The rollers of your sliding door are comprised of two parts that tend to get pocket doors off track. The roller is attached to the base, which is joined with the door. As you use your pocket door over time, these parts may begin to separate and get misaligned. Nevertheless, you can easily adjust pocket door bases and rollers and make them functional again.
You may also notice that one of your doors is not hanging straight, which is also caused by the rollers. Rollers are unfortunately located in the wall in most instances, presenting a challenge on how to access them. You may wonder – how to get a pocket door back on track in this situation?
- Before I jumped to the conclusion that you need to cut holes into the wall, it is always a good idea to lubricate the rollers to see if this alleviates the issue. You can use silicone spray or grease as a lubricant and apply it liberally.
- You may also want to inspect the screws that were used to hold your sliding door in place. Many times, these screws do not have the proper threading to hold the weight of it for a long duration.
- Sometimes, even metal stud drywall screws are used. These are not the right screws for holding your pocket door as they are not strong enough for the weight of the door for long periods of time.

You can presume that you have a problem with the door screws if you have not used it for some time, and it fails at the first chance of being opened or closed repeatedly. It may also present a degraded performance if it is opened and closed too frequently.
Other times, you may have a roller that loosened up over time. The rollers may need to be adjusted by moving the bracket up or down against the door bracket. You can do this by adjusting the bolt that holds them in place. You will have to disassemble the frame or cut a wall hole to access the door hardware (roller and tracks).
Track Issues
Sometimes the track of your slider begins to sag or causes the rollers to bind. This typically happens with multi-section tracks when the screws or bolts loosen without warning.
A derailing of the rollers can even occur, or the track may loosen from the support pockets that are part of the roller frame. This will cause the door to rub against the floor when you open and close it. You may even see the door begin to bend or flex in the track as it is moved.
All of these pocket door repair scenarios require that you have some access to the track and roller system. That way, you can get your power tools into the confined area and make the necessary pocket door adjustment or repair.
You may be lucky and be able to reach the problem without having to cut a hole in the wall if you have the right tools or the issue is visible outside the pocket area. It isn’t uncommon for your door hardware to fail sometimes, and hopefully, your repair is quick.
How to Repair a Pocket Door
Now that you know what issues can occur, I’m going to give you a few easy steps on how to repair a pocket door.
Depending on where the issue occurs, you can sometimes get away with fixing the problem and not touching the frame. With some specialty tools and closing the door part-way, you can sometimes repair the door without removing the frame.
You will need specialty angled wrenches that can fit in a small opening. Sometimes they come with your doors at the time of installation for this very reason. Also, grab a utility knife.
Step 1: Remove the Door Frame
If you don’t have the specialty tools that are needed to fix a sliding door when hung, you can start to provide access by removing the molding around the frame of your door, much like you would do to a mirror frame. This will allow you to take off the door completely from its hanging position.
Usually, the pocket door removal starts with taking it off the door frame. Then, you will be able to fix many of the issues that arise with these types of doors.
- To begin the process of removing your sliding door from the hardware system, you need to open one side of the door frame.
- You can then tip the door to remove it outwards from the bottom of the pocket opening. This will give you good access to the rollers and tracks that are directly above the door.
If you are having trouble with removing a pocket door from the track, you will need to examine the roller and track first. This should give you a good idea of how these components work. You can remove the door from the track by tilting it off the track and separating the rollers from the track part of the door frame.
For even more access, you will need to remove the molding on the frame carefully. However, it may not be intuitive to remove the frame if it has been painted or stained. Keep in mind that it could cause some damage if not done properly.
Start by taking the casing molding out. You will then have to decide if you need to remove the side or top piece, depending on which looks like it was the next piece attached. Use a 3-inch putty knife to get under the paint or varnish and pry it from the wall. Remove the last piece to expose the internal workings of the door frame.
You may have also been wondering how to remove a pocket door without removing trim. It is not really advised as you can cause damage to the surface of your door, as well as the structure that holds the door in place.
As much as you may not want to, you need to remove the trim work for the easiest and more effective way to take your door out. This will keep the structure safe and prevent any damage from occurring.

Step 2: Provide Wall Access
If you realize after removing the door frame that you no longer can access the rollers and track where you need to, you may have to cut a hole in the wall for access to the proper pocket door components. This can also be accomplished if you don’t want to ruin the integrity of the molding around the door frame.
To cut a hole in the wall, you will need a sawzall, a hacksaw, or a demolition saw to create an opening that is 3-4 inches in length. It should have a width that will allow your hands and tools to get inside the hole to do the repair without restrictions. This will give you a proper view of the internal workings of the door.
If you have wallpaper on your walls, you will need to either cut through it and replace it later or access the door from the opposite wall. Choose whichever method will cause the least amount of damage. Make sure to wear a pair of safety glasses for your cutting.
Now you will be able to see exactly what the issue is with your door. Your wall hole should not be situated in a location where it restricts access or cuts to the framing of your pocket door.
Choose an area on the wall that will allow you to reach your sliding door’s roller and track system with ease and not create too much damage to your wall in the process.
How to Adjust a Pocket Door
Now that you have completed creating access to your door track and roller system, you can see if it needs an adjustment. Understanding how to adapt a pocket door will come in handy as this is a very common issue that occurs over time.
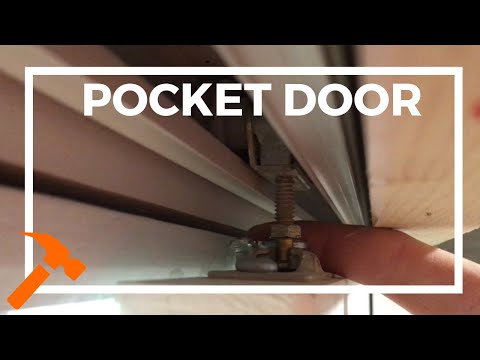
To adjust the door, you will need to have a wrench handy to adjust the hangers on the door. You will find a nut on the hanger of your pocket. In most instances, there are two hangers that may both need adjustment. You should double-check both hangers since you have total access at this point.
Adjusting the Nut
Start by turning the nut with a socket on each hanger clockwise. This will raise the door up. If your door is too low, you can lower it by turning the nut counterclockwise.
Be sure to turn both nuts the same amount to ensure the slider stays level during operation. If you fail to adjust both hanger nuts the same amount, you will have a door that is crooked when opening and closing.
You will need to adjust the nuts one turn and then check the height of the door. Take into account that you will only be able to raise the door to a certain degree. Too much upward height can cause the pocket latch to misalign, making it impossible to operate the door effectively.
Adjusting the Hanger
Another adjustment option for your pocket door is to adapt the side movements. You should examine the gap along the door sides. The door may be rubbing as it opens and closes, and that can cause damage to your door’s surface.
Do a quick examination of the door to identify if there are any gaps. There may be a large gap at the top of the door or the bottom of it. Top gaps require a raising of the door.
Start by adjusting the hanger on the door that is positioned the farthest away from the door latch. Use a pocket door wrench to turn the hanger a quarter of a turn at a time until the door is parallel with the jamb.
If you have a gap at the bottom of the door that is causing rubbing towards the top of your door, you can lower the door by adjusting the hanger that is positioned the furthest away from the door latch.
As you adjust the hanger, you will see the bottom of the door get closer to the jamb. This should eliminate the gap. You will need to move it one-quarter of a turn until it is properly aligned.
How to Replace a Pocket Door
Depending on the issue you are having with your slider, you may have thought about how to replace a pocket door but have been unable to understand the process thoroughly.
Removing the Door
As the first step of pocket door replacement, you will need to cut a hole in the wall for access to the rollers and the track system, in addition to removing the frame of the door. You will now have complete access to the roller and track. You can remove the old door by tilting it down and taking it out from the rollers.
Removing the Track
To remove the track system to replace the door’s operational components, you will need to pull the track out by removing all the screws holding it in place. As you install a new track into the same spot as the previous one, you will have to take into account any gapping that has occurred. This can be eliminated by making sure the track is level as you mount it into position.

Shimming the Track
If you have an older home, you may need to use shims under the track if your house has shifted or settled over time. When you have placed the track as level as possible into the header of the pocket door opening, you can screw it into place.
You need to double-check if the rollers of your new track need to be inserted before you install or if they can be added after you have hung the track. Be sure to double-check on this requirement to avoid having to remove the track again to insert the rollers as directed.
Replace Roller Hardware
This is also a good opportunity to replace the roller hardware that is located at the top of your door. Simply screw the new rollers onto the top of the door and re-hang it. Understanding how to rehang a pocket door takes some finesse.
You will need to line up the rollers on your door with the tracks and ensure it rolls smoothly back and forth.
Installing the Door and Frame
If your old or new door is quite heavy, you can use a pry bar or shims to lift it into place or hold it into position as you place the rollers on the track. This will make it a little easier to work with.
Now you can replace the frame of your door piece by piece to preserve its integrity and appearance. Hopefully, you were able to take the frame down gingerly and still have the entire frame intact. This will allow you to replace it with ease and get on to repairing the wall opening you created as an access point.
How to Trim a Pocket Door
Sometimes pocket doors can be obstructed from opening if they are too long for the doorway opening. You may have installed carpet or tile to the flooring surface that has raised the overall floor height. This means you need to trim the length of the door – this can easily be accomplished by using a saw to plane the edge of the door to fit it to the new opening height that you now have.
Solid Core vs Hollow Core
Most pocket doors come with a solid core at the bottom. This allows you to make adjustments to the height of the door without worrying about detracting from the appearance of the door or changing its integrity.
If you don’t have a solid core door, there is only a certain degree of trimming that can be done. Otherwise, you will compromise the integrity of the door.
Measure and Mark
To begin the process of trimming the door, you will need to mark the length you need to remove. A knife works well for this as it will create a mark without making a visible outline on the door’s surface.
Cut the Door
You will then need to cut your door where you have marked it using a circular saw. It is best to leave the door hanging and use a low blade speed to cut the bottom core of the door. Be sure to keep your circular saw horizontal as you cut.
If you have a table saw large enough, you can also use this! Using a table saw will be more accurate, but you’ll need to take the door down and move it to your shop where the saw is located.
Your saw should be able to clear as much as 1-1/2 inch off the door if needed. This will allow your door to clear carpet or tiling with ease.
To cut the door with your circular saw, you will need to keep the foot flush with the face of the door. Open the blade guard as you cut to provide more flexibility. This will allow you to cut exactly where you need to on the door surface.
You are now ready to power up the saw. Hold it firmly as you work, and allow someone to move the door closer as you cut so you can cut the entire surface evenly in one pass. You should be able to saw almost the entire door length without any issue.
If needed, the remaining portion of the door that needs to be cut can be trimmed using a sawzall, a mighty jigsaw, or keyhole saw, depending on what you have available in your home workshop.

By trimming the door while it is still hanging, you can make a precision cut without having to contend with removing the wood frames surrounding the door. You won’t have to detach it from the track and roller system to get it to the correct height.
Your door should fit perfectly in its pocket space and no longer rub on the flooring as you open and close it. Hopefully, you won’t need to do any floor repair at the same time.
If you are wondering how to trim out a pocket door, you can easily do this by replacing the current trim finish with newly painted or varnished pieces. You can also paint or varnish the trim after it is added if you prefer.
You will need to make sure they fit properly and provide the desired look you want to achieve. The trim shouldn’t obstruct the operation of the door in any way. It should provide an esthetically pleasing appearance that frames the entire pocket door.
Conclusion
Now that you know all the common door repair issues, you should have no problem understanding how to take care of a pocket door. By keeping an eye on your door’s operation, you can remedy most of the issues that occur before they become a real problem which requires more significant pocket door repairs.
Take your time to understand the operation of your pocket door. Don’t be afraid to cut a hole in your wall if you need access to the roller and track that are positioned in the wall. While this may seem like an inconvenience, it is the only right way to repair your sliding door so it works and provides you plenty of function for years to come.
When it comes to decoration, you can always use a scroll saw pattern to add a Christmas accent piece for the holidays to hang beside or on your door.