
As the organic movement continues to spread, growing your own vegetables and fruits from your yard is one of the easiest and quickest ways to help take control of your food supply. One of the most important factors to growing is the soil you use, and composting at home is an easy, cheap, and all-natural way to create the best soil around.

I will show you how to make a DIY compost bin from nothing more than scrap wood. Or, if you have a pallet lying around, you can just as easily make a pallet wood compost bin. Then, with nothing more than food scraps and some Amazon boxes, you’ll be well on your way to creating some amazing, organic soil for your plants.
Contents
Composting Basics for Success
Compost is really nothing more than organic material that can be added to soil to help plants grow. With 30% of my weekly waste being comprised of compostable food, there is a lot of opportunity for the average family to create their own organic soil.
Composting adds vital nutrients back into the soil, allowing the dirt to retain moisture better and resist disease. Your plants will grow a lot better in this material, and you won’t have as much of a need for fertilizers. Beyond that, you are helping the environment by reducing your carbon footprint.
What to Add
Compost is comprised of three basic components: greens, browns, and water. These three parts, in the correct portions, will naturally break down into nutrient-rich dirt for you to use in your garden.
Browns:
- Dead leaves and pine needles
- Sawdust, stray, and hay
- Corn stalks
- Paper, newspaper, and coffee filters
- Dryer lint
- Cardboard (without paper or tape)
Greens:
- Grass clippings and plant trimmings
- Vegetable scraps
- Fruit scraps
- Coffee grounds and tea bags
- Crushed eggshells
- Banana peel and avocado skin
- Pasture animal manure
With equal parts brown and green material, and enough water to keep the compost pile moist, your composting will take place. The brown items produce carbon, the green items product the nitrogen, while the water is the moisture that allows the composition to take place.
If you maintain your own yard, and combine those efforts with your own food waste, much of this is easy. Grass clippings from your lawn mower, along with dead leaves, will combine nicely with leftover eggshells and vegetable scraps
What to Avoid
There are a number of things that don’t belong in your compost pile. At first, it mind seem hard to keep track of, but it will become second nature before long.
Don’t Use:
- Meat scraps and bones
- Fish scraps and bones
- Dairy
- Anything greasy
- Pet feces
- Weed trimmings
- Plant trimmings with pesticides
- Charcoal

Animal and fish meat is greasy and fatty, and will attract rodents and pests to your compost. Don’t compost meats and fish without several extra steps to your process. Weed trimmings, depending on what season they are in, could actually be fine. However, to be safe, I find its best to just avoid them all together.
Advanced Tips
Always crush your eggshells. Without being crushed, they take a lot longer to break down in your pile.
Speaking of eggshells, always rinse them out before crushing them and placing them in your compost bin. Eggs are a tricky item for composting, because the shells are great but the eggs themselves are not. Rinsing out the eggshell ensures that you don’t get any of the egg in your bin.
While sticks aren’t inherently bad for your composting pile, they take a long time to break down. Unless you are at a serious lacking for brown material, avoid putting sticks and twigs in your pile. This will allow your compost to break down quicker.
Finally, consider picking up a stylish storage container to use next to your sink in the kitchen. This will make it so that you don’t have to constantly be making trips out to your compost bin, and increases the likelihood that you’ll utilize the bin.
Airflow
In order to achieve the high temperatures that facilitate the optimal conditions for rapid and thorough composting, air circulation is critical. The easiest way to ensure you have a good amount of flowing through your compost is through the bin’s design, which is what these plans encompass.
It’s also important to rotate your compost frequently, usually with a shovel or rake. You can build advanced turning mechanisms to your bin, but it really isn’t necessary. The key is to be frequently turning your compost material over, and incorporate a bin design that has constant airflow.
What Goes into a Good Bin
Before I dive into the building process, it is important to review the important elements for a good composting bin. If you don’t take these things into consideration, your compost collection area might not actually work.
Location
Before you start building, you should determine where in your yard you’re going to put the compost bin. A great place to consider starting might be near a homebuilt shed or other storage. There are several factors to take into consideration:
- Level surface
- Good drainage
- Accessible to kitchen
- Receives some sun and some shade
- On top of soil or grass (not concrete or asphalt)
- Far enough away to not smell the compost
For starters, you want to pick a location that has a level surface and good drainage. You don’t want rainwater to collect in the bin.
Accessibility to your kitchen, which is where a lot of your green material will come from, is key. If you put your compost area too far away, you might not be as diligent in utilizing it. Make sure its close enough that you’ll be likely to add to your the compost pile, or pick up a smell-free pail to store the material in your kitchen.
You want your compost to receive sun, especially in cooler climates in the northern latitudes. Simultaneously, in warmer southern latitudes, you’ll need to make sure it doesn’t receive too much sun, and some pockets of shade throughout the day.
Don’t place your compost bin on top of concrete or asphalt. Make sure it sits on soil of some sort. This allows the true composting process to fully engage, and you’ll find more earthworms in your soil.
Lastly, keep the compost area away from windows and neighbors. Depending on what you put in the pin and how much sun it receives, it can start to smell at times, so you don’t want to be affected by it if you can help it.
Tip: you don’t want your pets to get into your compost bin. If you let your dogs run free instead of keeping them inside of a fenced area, or you have other pets, keep this in mind as you pick your location.
Size
The size of your compost bin is really a matter of personal opinion. The larger you make the bin, the more you’ll be able to fit in it, and the more compost you’ll be able to create.
If you’re just starting composting for the first time, you might want to opt for a smaller bin size. This is a bit more manageable. And, given how these DIY compost bins are relatively easy to make, you can always build a larger one if you get hooked on compost.
The size of my compost bin plans PDF you can download is 43” x 40”, which is just under 4 feet square. It is 28” high, which is right around 2.5 feet.
It’s pretty easy to take the plans and expand on the size, so once you determine the location and amount of compost you want to make, you can alter and adjust if need be.
Material
Let’s start off by getting this out of the way – you don’t need nice wood for composting. As a matter of fact, any scrap wood or pallet wood will do just fine.
For this specific project, I used a lot of scrap wood that I had left over from an outdoor project. Had I had pallets, I would have been just as likely to use them.
Pallet wood is a little thinner than a standard 2” x 6”, which is what I used in this tutorial. That isn’t a big deal but it is worth offering up as a distinction.
Supplies and Tools You’ll Need

One of the beauties for most DIY woodworking projects is that you don’t need many supplies, and what you do need is really cheap. This is composting bin is no exception; I actually found that the most expensive part of the entire thing was the chicken wire!
Supplies:
- (4) 2 x 6 pieces of wood (120” long)
- (2) 2 x 2 pieces of wood (96” long)
- Wood Screws (2.5” long)
- Brad Nails
- Chicken Wire (24” high x 160” long)
Tools:
- Measuring Stick
- Pen or Pencil
- Table Saw or Circular Saw
- Brad Nailer or Nail Gun
- Cordless Drill or Screwdriver
How to Make a DIY Compost Bin
Now that you have all of your supplies picked out and ready to go, it’s time to get started building. This is a great afternoon project that you can involve your kids in. While one step involves cutting the wood with a power saw, everything is perfectly suitable to work with your children.
Measure and Mark Wood
First, start with you 2×6’s. At 120” long, you can cut each 2×6 into (3) 40” pieces of wood. That is why this DIY compost bin originates at 40” – it allows you to make the best use of your scrap wood.
You’ll need a total (12) 40” boards, which means you’ll take (4) 2×6’s in total. Measure and mark 40” increments in length for cutting later.

Next, take your 2×2’s. At 96” long, you’ll can cut each 2×2 into (3) 28” pieces of wood. You’ll need (2) 2×2’s, as you won’t have quite enough length with one.
Mark the 2×2’s with 28” lengths. You’ll end up having a little scrap wood left over when you’re done.
Cut the Wood
Next up, it’s time to cut your wood. There really aren’t many cuts to make for this wood compost bin, and so it shouldn’t take long.
A good table saw will be the quickest and most accurate tool to use for cutting. Once you set your table saw fence, you’ll be able to quickly make all of the cuts you need.
You can also use a circular saw if you don’t have a table saw. The cuts for this composting bin don’t need to be precise, and so a circular saw will work just fine.
Cut all the wood, making sure you end up with (12) 40” length 2×6’s and (4) 28” length 2×2’s.

Build the Sides
Before assemble, you need to build the sides of the composting bin. You’ll be building two sides, and then assembling the final two.
Don’t move quickly through this stage. Measuring is key so that you end up with two sides that fit properly together.
Your composting bin side will be made up of 4 of your 2×6 pieces of wood. These 4 pieces will be layered over a 28” section. Since each 2×6 piece is 5.5” high, 4 of them equals 22”. This leaves a total of 6” of space to fall between the 4 2×6 pieces.
As I outlined earlier, air flow is a key part of creating a good compost bin. This 6” of space, spread over the total bin height, will provide for this air flow.
Lay out your 4 2×6’s on the ground, putting a 1.5” gap between each 2×6. You will end up with 4 slats that collectively measure up to 28” high. Perfect.
Next, take a 28” 2×2, and line it up so that is runs vertically across the 4 2×6’s vertically. Position it so that it is 1.5” in from the edge, and screw the 2×2 into each 2×6 slat with several wood screws.

Do this for each side of the 2×6’s. You’ll want to repeat this process a second time, so you end up with two compost bin sides. Each side will be 28” high and 40” long, made up of (4) 2×6’s and (2) 2×2’s.
Use a robust socket wrench or cordless drill to speed up the process of screwing the wood together.
Assemble the Bin
With all the wood cut, and your sides constructed, it is time to assemble the composting bin. You should have two sides already constructed. Now, take your remaining (8) 2×6 pieces, and affix them individually to the vertical 2×2’s, lining up the compost bin in a square shape.
Use wood screws in the same manner that you built the sides of the composting bin.
(Make this a boxed tip) When you select the correct screw length, you can screw from the 2×2 into the 2×6. This will mean that you don’t have any screws showing on the outside of your compost bin. While it is purely cosmetic, it’s a nice touch of professionalism.
You’ll probably find this easier to assemble a second set of hands to hold the planks in place. Or, alternatively, you could use clamps to hold the wood in place while you screw.
Make sure to do the final assembly process on a level, solid surface. You don’t want your DIY compost bin to be off-center, and putting it together on a flat surface will help.

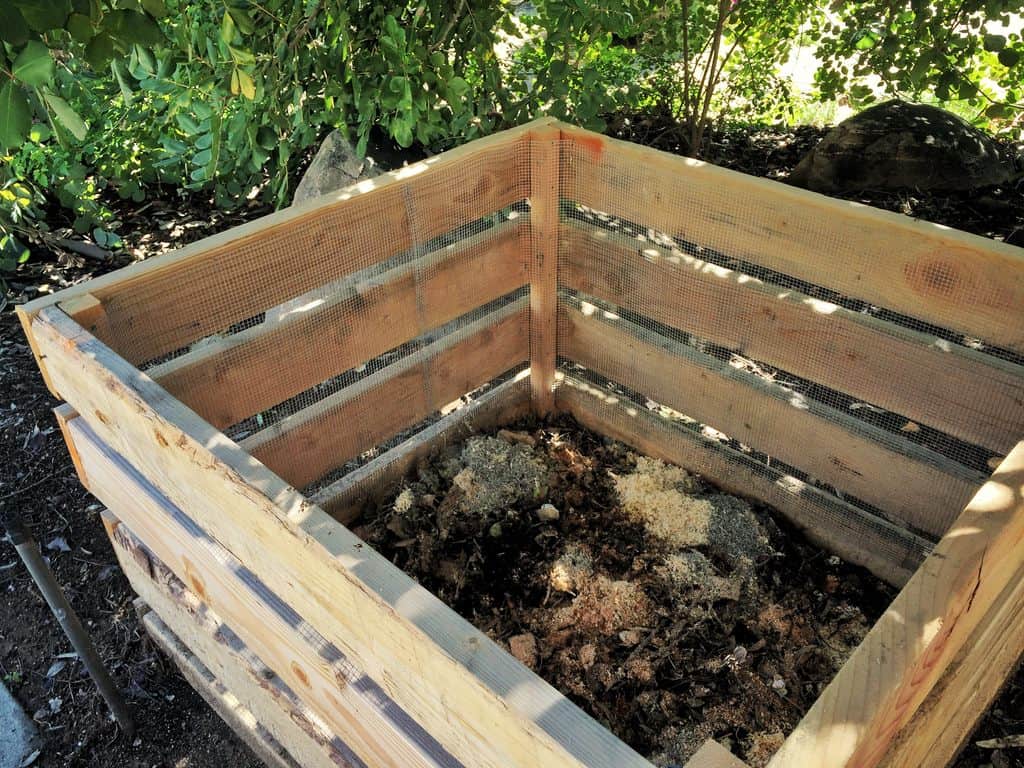
Affix the Chicken Wire
At this point, your composting bin is basically finished. However, without adding the chicken wire, there will be gaps in the bin where your compost can fall out. This is where the chicken wire comes into play.
As a review, the reason I have these air gaps in the first place is because air flow is key for healthy composting. Without the air flow, the decomposing process slows down and stalls out.
The gaps in the 2x6s allow for air to reach your material at all times. This, along with frequent and consistent rotation, will produce wonderful organic soil.
The easiest way to affix your chicken wire is with a cordless pneumatic brad nailer or nail gun. Place the chicken wire on the inside of the bin, and go around in a circle attaching it to the wood slats. Using a brad nail gun makes this super fast, although it can help to have a second set of hands to hold the wire in place.
Don’t mistake a finish nail for a brad nail – they are very different, and you want to be using brad nails for this project.

Final Steps
At this point, you are finished. If you’re someone who has enjoyed a wide range of woodworking projects, you might be wondering why I don’t have any finishing on the bin, such as painting the wood or adding polyurethane or polycrylic.
Odds are you could add a finish coating on your bin and be fine. However, there is a group of us that don’t really like adding any sort of finish to wood that is going to come in contact with soil I’ll be growing food in.
At the end of the day, it’s a matter of personal preference. Jeremy at GrowVeg.com does a great job going into detail on this topic and I recommend reading more on it to determine where you land.

Start Composting
Your compost bin is ready to go! Start by adding a 4” layer of browns, like cardboard, sawdust, and dead leaves. Then, add a 4” layer of greens, like vegetable and fruit scraps along with some grass clippings. Keep alternating the process, ensuring you are turning over the compost frequently.
Depending on a variety of factors (weather, heat, amount of material, etc), you’ll have gorgeous, organic, nutrient-rich soil ready to go in as fast as 2 months!
Great article with a well designed, simple to build compost bin. I love to grow my own veggies and know that I SHOULD be composting my kitchen scraps to nourish my garden soil, however, I have not yet made the effort. You have inspired me to begin composting this year. Thank you for the information you shared, especially on what ingredients to add or avoid.
Thank you so much Lisa! Good luck with your composting!