As an Amazon Associate we earn from qualifying purchases.
The possibilities of homemade pallet headboards are nearly endless. With the creative opportunities of a DIY pallet project, you are also bringing in a comfy addition to your bedroom. Overall, it’s an easy project you can customize to your skill level. Let’s get started with the best DIY pallet headboard ideas!
Contents
DIY Pallet Headboard Instructions
Before You Start
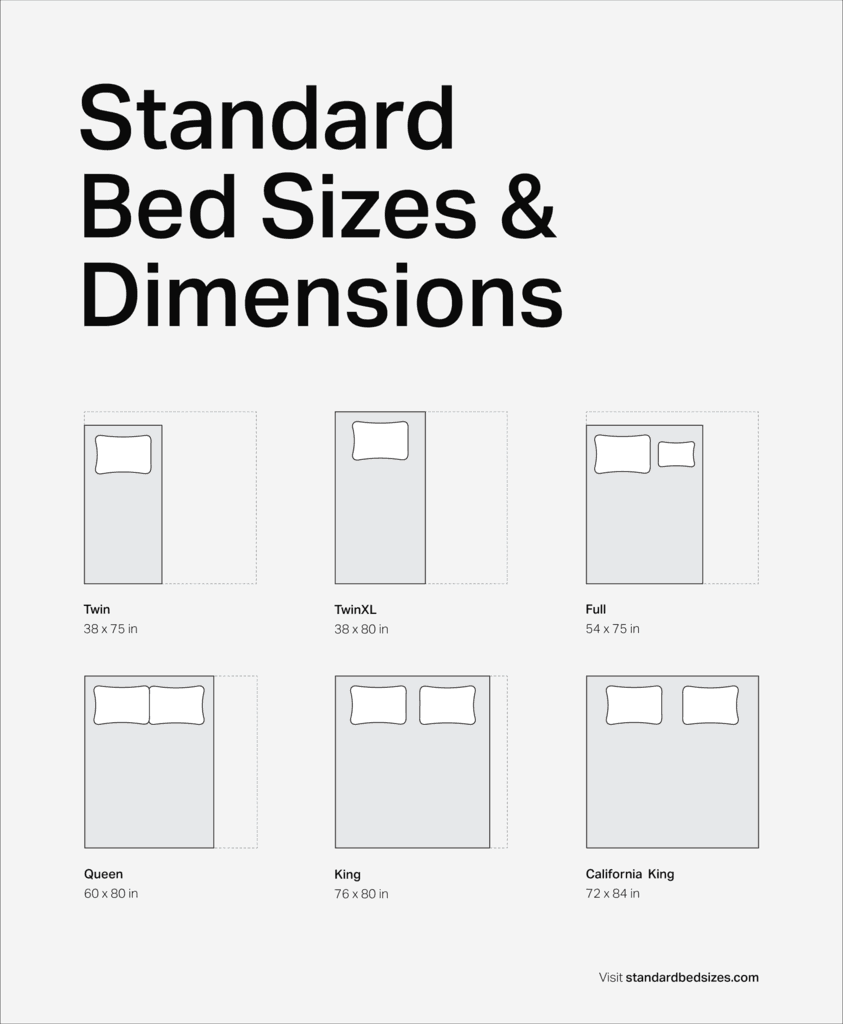
Before you get started, you need to know how large of a wooden pallet headboard you need to build. There are standard bed sizes, so you’ll want to know which bed type your building a headboard for.
Standard bed sizes are as follows:
- California King Bed: 72″ wide by 84″ long
- King Bed: 76” wide by 80” long
- Queen Bed: 60” wide by 80” long
- Full Bed: 54” wide by 75” long
- Twin Bed: 39” wide by 75” long
Your headboard will need to be at least as wide as your bed is. I recommend extending that size by 3″ on each side, as I’ll discuss later.
Before you get started, take stock of what bed type you have. If you don’t know, get out a tape measure and figure it out.

Adding three inches to your initial measurement makes sure that your bed is fully covered and also locks your bed in from a design perspective.
Such a DIY headboard made from pallets will not just be sitting flush: since your bed is slightly smaller, this will create a secure place for it to fit with the headboard against the wall.
Keep in mind the standard bed sizes when you measure for your headboard. Because a standard twin size mattress is 39” wide, one pallet might be enough. For any other bed type, you’ll need more than one pallet.
Supplies and Tools Needed
Every good woodworking project starts with a great setup. You can easily complete this DIY pallet headboard project in a day or even just a few hours if you have everything ready to go before you start.
Pallet Headboard Supplies
- 2-4 pallets (see below for more detail)
- 1-2 2×3’s (for frame)
- Wood Screws
- Nails
- Hammer
- Power drill
- Jigsaw
- Paint or wood stain
- Polyurethane finish
Don’t be discouraged by the long list. Everything but the pallets is definitely doable in one shopping trip. Similar to other pallet DIY projects, gathering all of the supplies at the beginning will save you time in the long run.
Ok, let’s get started! Once you have your materials and measurements, you’re ready to begin. There are a few creative choices to start your setup with.
Step One: Pull the Pallet Wood Off of the Pallet
A pallet comes assembled and nailed together. For this headboard design, you need to disassemble the pallet so that you are left with a bunch of long, rectangular boards.
Be careful pulling the wood off of the pallet. Pallet wood isn’t of the highest quality. Beyond that, it has often been hastily constructed and potentially has been sitting out for a while. All of this leads to its fragile state.
Pallets are normally nailed together at the ends, so you can use the backside of your hammer to pry out the nails.
You can also use a crowbar if you have one. Try to damage as little of the wood as possible (although some casualties are to be expected).

Step Two: Trim the Ends of the Pallet Boards
Now that you have a bunch of pallet boards, you need to trim the ends of each board.
During the removal process, chances are that you damaged some of the ends. I need each end to be square and free from damage. For this, the highly versatile jigsaw is the perfect portable tool to use.
You only need to trim the edges of the pallet boards that got messed up. Use your jigsaw or circular saw to quickly trim the edges.
Note: for greater accuracy, you can also use a table saw if you have one. A high-quality, portable table saw allows you to set a fence according to one measurement and then rip out a bunch of cuts very quickly.
Step Three: Sand Your Boards
You’ll be sanding more at the end of building a pallet headboard process, but it’s good to give all of the boards a quick, rough sanding. Get out your sander and give them a quick sand job, or you can also use a planer if you have one.
If you’re going to paint your headboard, it may be easier if you sand down your pallets first. In that case, grab some “lower grade” sandpaper. The grades are an indicator of how fine the sandpaper is. Usually, pallets are not gritty.
After you clean them, very fine sandpaper can disrupt enough of the top layer. The paint will appear evenly in layers, and you won’t see a ton of paintbrush lines.
If, instead, you’re going to stain and finish your headboard, then you can save some of the detailed sandings for after construction.
Finally, examine your wood for any big holes or gaps. You can fill those with a filler that is designed to take stain or paint now. The wood filler will cover the holes and actually make the entire piece of wood stronger.

How to Make a Headboard Out of Pallets
There are a number of ways to make a headboard from scrap wood like pallets. This specific process focuses on a simple, easy plan. There are a lot more complicated and sophisticated plans on how to make a headboard out of pallets – I focus on ease of execution here!
Final Measurements: You already have the measurements for the width of your bed – all you have left to decide is how high you want your headboard to be. Most headboard frames are 24 – 36 inches tall, but you can make yours as tall as you want.
You will also need to add two legs to the frame. These legs will attach to your bed frame to hold the headboard in place. The legs need to be long enough to reach your bed frame and high enough to take into consideration the size of your headboard plus your box frame and a mattress.
Measure your bed from the top of the mattress to the floor and subtract three inches. Subtracting a few inches puts your headboard right below the top of your mattress.
Review: you need measurements for your headboard width and height, as well as measurements for the two legs.
DIY Wooden Pallet Headboard Frame: This isn’t hard. Take your finished measurements and, using the 2×3’s, build the frame. Use scrap cross pieces from your disassembled pallet as cross beams in the frame for support.
Your pallet headboard frame doesn’t need a ton of support, but you want to make sure that it is solid. It will be holding a decent amount of weight, depending on how large you’re building it. Spend a few extra minutes hammering some nails in and around the support beams.
Attach Pallet Slats: Now is the time when your project begins to take shape. You need to cut to size and attach your pallet slats to the front of your frame.
You want the slats to be alternating in terms of the breakpoints between the boards. Since they are already different shapes from the cutting that was done in a previous step, you might as well lean into the rustic, eclectic look.
Plan out the pattern by laying out your pallet slats first, marking and measuring, and then cutting. Your jigsaw or table saw will be able to handle the cuts easily.
While I didn’t list it within the supplies, if you have a nail gun, now would be a great time to use it.
Optional: Frame the entire edge with your remaining pallet slats. This is optional because it is purely cosmetic. It’s nice to do because it covers your fresh cuts (newer wood) and keeps them from standing out up against the old, weathered pallet wood on the front of the frame.
Attach Legs: Take the legs and attach them to the back of your simple headboard frame. Take care to measure again before you attach.
Paint, Stain, or Finish: Now it’s time to apply the finish you’re looking for. Whether you want to paint your pallet wood, stain it, or just add a coat of clear finish, you’ll want to add some sort of finish work.
Attach Headboard to Bed: Your bed frame is complete, and all that is left is to attach it to your bed.
At any point along the way, feel free to add your own customization. That’s the wonderful thing about working with pallet wood – no two pallets are the same. Every pallet is a little different, which affords you the opportunity to add your own personal flair to every pallet project.
Customize Your Simple Pallet Headboards
From the directions above, your pallet is simple and rustic looking. If that’s not the look you want, you’re still OK. One of the benefits of working with pallets is how easy they are to customize.
Grab a buddy for this part, as you want the headboard to be square with the frame.

Creative Customization
When you’re looking for ways to get creative, keep these tips in mind:
- Nail planks over your headboard into designs such as triangles or create a barn door look.
- Use multiple stains or paint colors creating a greater dimension.
- Apply a matte or low gloss finish over the border, making any high-gloss finish areas appear larger.
More on Staining Your Headboard
There are many ways to make your simple pallet headboard unique. Keep an open mind and use your time setting up as an opportunity to explore what you can do with the blank slates in front of you!
The other creative aspect you encounter on this list is the stain and finish. A finish works great, but there are a few options in how glossy or matte you want your headboard.
Paint typically can take a matte look very well, and so can a light wood stain. However, most dark wood stains look best under a high gloss where they catch the light. This trick can help make your room larger or, inadvertently, smaller.
More Power Tools
You can definitely complete this project without power tools.
However, save yourself the struggle. A power drill or power saw can reduce the number of hours you spend working on a simple pallet headboard.
Conclusion
You now have a completely unique headboard! During the installation, you can support it on the legs you’ve created or by attaching it to the wall. This added step is for safety, although it isn’t likely your headboard will be coming down with your mattress in front of it.
Now, show off your unique project and pass these directions on to your friends when they’re wondering how to make a king-size pallet headboard, a full-size pallet headboard, or any other.
If you have some leftover pallets from this project, simply re-purpose them into a little fence for your pets.


